Some laptops feature switchable graphics in which the system can choose to use either the integrated GPU or the discrete GPU, allowing less graphically-intense programs to use the battery-saving integrated GPU, while giving graphically-intense programs (such as games) their much-needed power by running them on the discrete GPU.
This detection is not perfect; in some cases, you may need to force your computer to run Minecraft on the discrete GPU. This article demonstrates how you can do that on Nvidia Optimus systems.
Instructions for Windows
1. Click the Show Hidden Icons button (Looks like ^) on your taskbar, then right click the Nvidia icon and select Nvidia Control Panel.
![]()
If you do not have the Nvidia icon in your system tray, you can access the Nvidia Control Panel from the File Explorer by going to
C:\Program Files\NVIDIA Corporation\Control Panel Client. From there launch nvcplui.exe by double-clicking on it.

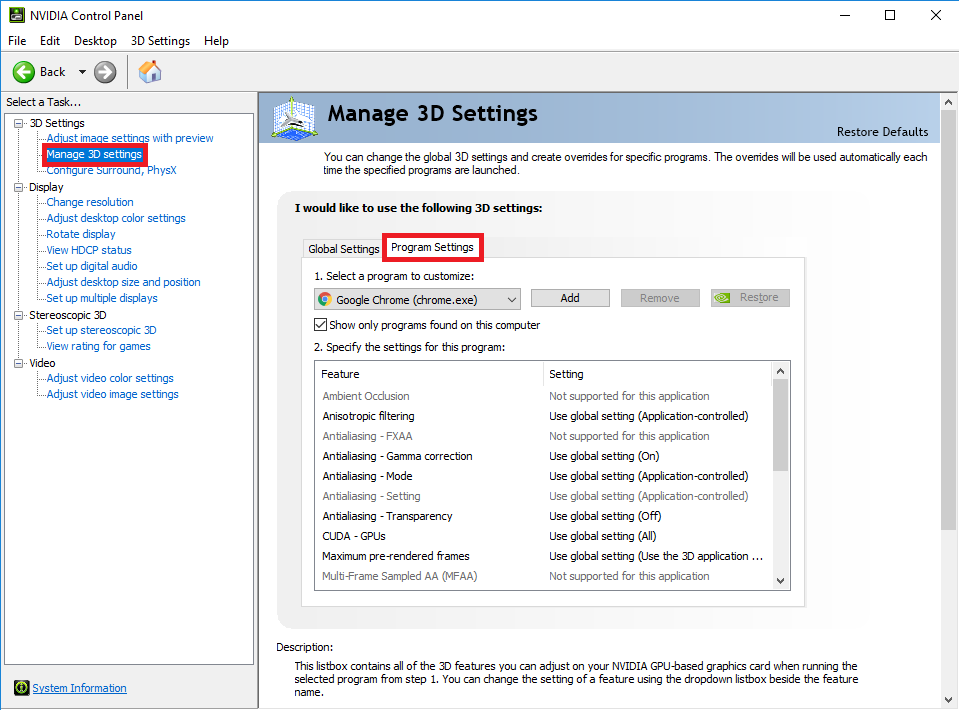
2. In the Nvidia Control Panel, click the “Manage 3D Settings” option from the menu at the left, then click on the “Program Settings” tab.

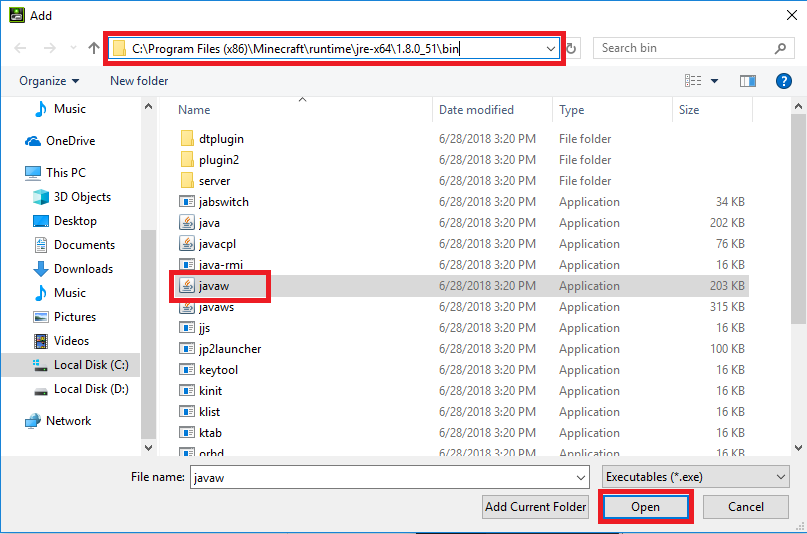
3. Click on the “Add” button, and in the window that opens, click the “Browse” button.
4. Depending on the Minecraft launcher you use, the path you need to enter may vary.
- For the legacy launcher (Grey creeper icon):
C:\Program Files (x86)\Minecraft Launcher\runtime\java-runtime-delta\windows-x64\java-runtime-delta\binEnter that in the address bar at the top of the Browse window selectjavaw.exe, then hit “Open”. - For the MS store launcher (Green creeper icon):
C:\Users\User\AppData\Local\Packages\Microsoft.4297127D64EC6_8wekyb3d8bbwe\LocalCache\Local\runtime\java-runtime-delta\windows-x64\java-runtime-delta\binEnter that in the address bar at the top of the Browse window selectjavaw.exe, then hit “Open”.

Note: If you have set the game to use a different version of Java, or the bundled Java gets updated, you will need to adjust the folder you use for this step.
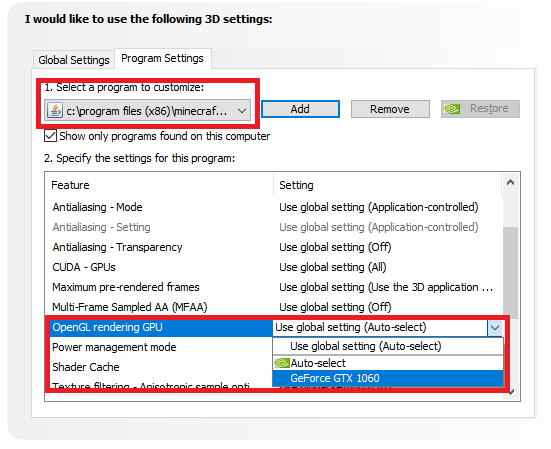
5. It should then autoselect what you just added, but make sure the Java you just added is selected below the “Select a program to customize option”.
6. In the list below “Specify the settings for this program” scroll down until you see the option “OpenGL rendering GPU”, click the drop down menu next to it, and select your Nvidia hardware.

7. Click on the Apply button, then close the Nvidia Control Panel and try to run the game again. you can press F3 ingame to confirm your Nvidia hardware is being used.