Setting up a Minecraft: Java Edition server
Minecraft: Java edition uses servers for online play.
If you want to temporarily play multiplayer with someone on the same network as you, you can press ‘Open to lan’ from the minecraft pause screen, and your world should show up for anyone on the same network
Hosting Requirements:
- You will need Java installed. For 1.16 and below, you will need to use Oracle Java/OpenJDK 8. For 1.17, you will need to use Oracle Java/OpenJDK 16. For 1.18 to 1.20.4, you will need to use Oracle Java/OpenJDK 17. For 1.20.5 and above, you will need to use Oracle Java/OpenJDK 21. You can follow this to install the right version of Java
- Minecraft: Java Edition (to join the server)
- A computer to host it on. This guide has instructions specific to both Windows and MacOS, but a Linux machine should work as well. It is recommended to host a server on a desktop computer, but you can use a laptop as well.
Setting up
- Make a new folder anywhere on your system, if you’re using Windows, then don’t use the onedrive folder. You can name the folder anything. This will be our server folder, or workspace
- Vanilla: Head over to Minecraft’s website and download the latest version of the server jar.
- Plugins: If you’re looking to add plugins download Paper.
- Mods: If you’re looking to add mods, download the Forge or Fabric jar.
- Place the file into your workplace
If you’re using forge, then you’ll need to run the installer and select ‘Install server’, click the 3 dots and find your workplace. Then you can install there
Now follow the OS specific instructions to setup the server.
- Rename the file you previously downloaded to ‘server’ (or server.jar if you have file extensions on)
- Open up notepad and paste
java -Xmx2G -Xms1G -jar server.jar -nogui pauseinto it, click Save As
- Go to the folder that contains your server, change the filetype to ‘all’ and name the file start.bat There must to be a .bat at the end of the file name,
- Run it, you will see a command prompt window briefly flash. Now, you’ll need to agree to the EULA to continue. If you agreed to it, you can now access the console
- Rename the file you previously downloaded from the Minecraft website to
server, orserver.jarif file extensions are shown - Open TextEdit, create a new document, and if you see markdown tools at the top of the text document, press shift-cmd-t to hide them
- Copy and paste the following into the text document:
#!/bin/bash cd '$(dirname '$0')' exec java -Xms1G -Xmx2G -jar server.jar - Press cmd-s, then navigate to your workspace folder. Title the file
start.command. Make sure it does not save asstart.command.txt. - Now go to your workspace folder, then double click on the
start.commandfile to run it. You’ll see a terminal window open. After agreeing to the EULA, you can use your server’s console.- If a message saying ‘Permission denied’ shows up, open terminal and run
chmod +x, then type a space, then drag your start.command file into the terminal window, then press enter and try running it again
- If a message saying ‘Permission denied’ shows up, open terminal and run
Eula
- Your server should’ve given you a message mentioning the EULA. Close that window.
- Go to your workplace folder, and you should see a few new files. One of them should be named
eulaoreula.txt. Double click it and you should get the below or something similar.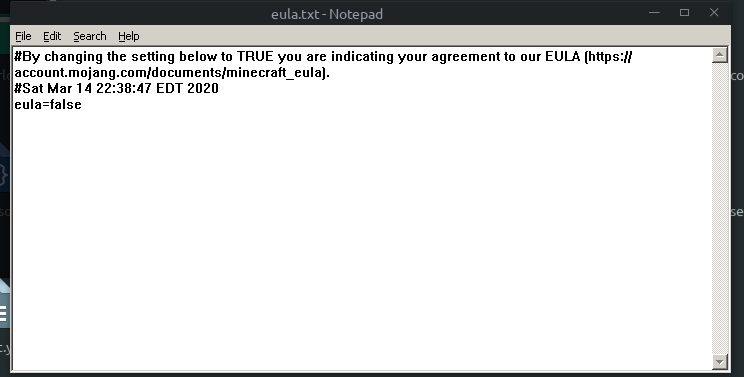
First, you need to read the EULA. If you agree to it, then change eula=false to eula=true. Now, your server is all setup for playing locally. Check out the information on playing with others
The Server’s Console
You can run commands like /op or /gamemode in it and it will tell you what the server is thinking and/or doing. When executing commands, make sure you do not include the / in front of the command, or it will not work. You may want to run op YOURUSERNAME so you can run commands outside of the console.
You can communicate with in game players from the console using say, and you can private message them with msg, but they won’t be able to reply
The best way to stop a server is to run save-all, then stop once the save has finished. This method will minimize the chance of something going wrong at shutdown. If for some reason, you cannot use commands, for instance, if the server is running too slow to register them, you can force stop the server by either using ctrl+c or closing the terminal window.
The console will also display information about how the server is running, if it is running too slow, it will show ‘Can’t keep up!’, and it also shows commands that are executed by ops and the game chat
You may have noticed earlier that the start command contains -nogui, this prevents the server’s visual interface from displaying. If you would like to view your server’s GUI, at the expense of some performance, you can remove the -nogui part of the command. The gui displays information about the RAM used in the top left, below that is a list of online players, and on the right is the console. You can type commands into the box at the bottom, and you can see the console information section
If you plan on leaving your server online for long periods of time, you may find it annoying to have your console open constantly. There is a utility called ‘screen’ that can help with this.
- To check if you have screen installed, you can run
screen -vin your terminal, if it outputs a version number, that means it’s installed.- If screen is not installed, install it with your package manager
- To start your server with screen, type
screen -S Minecraft_Server, then a space, then drag your file into the terminal. - To detach the server and have it run in the background, press cmd-a, then release, then press d. Your terminal should say
[detached]. - To access the server’s console later, run
screen -r Minecraft_Server.
You can also use this to access a server over SSH.
Playing Multiplayer
If you are playing with a person that is on the same network as you, for example if they’re right next to you or are in another room of your home, then please follow the Playing Locally section.
If you’re trying to play with someone that is not on the same network as you, for example, if they aren’t in the same household as you, please follow the Playing Online section
In order for them to join you, you will need to find your IP. You can think of your IP as a join code or friend code used to access the server)
- Open up command prompt, and in the command prompt type ‘IPconfig’. Press enter and look for something like:
IPv4 Address.......: XXX.XXX.X.X
Example Image: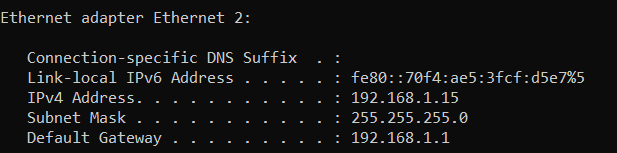
This is the IP that the person will use to connect to the server.Start up the server and then tell them to click ‘Add a new server’ or ‘Direct Connect’
-
For ‘Add a new server’ the name can be anything but the IP needs to be your IPv4 address, so tell them to put that there. Click finish and then double click the server and they have connected
-
For ‘Direct connect’ tell them to put your IPv4 into the ip box and click connect
If you want to connect to the server on your own computer then do the above but instead use ‘localhost’ as the IP
Most of the instructions here are for generic routers. They might not work for yours
If you would like router specific instructions, you can use portforward.com, which has instructions for specific routers. Follow along with the guide, and you can use this site to know exactly where each button isThere will be ads telling you to download such and such, do not click on them.When ads pop up, either ignore them or press the close button in the top right if they are full screen ads.
Instructions
-
You will need to get the IP address of the computer that you’re hosting on as well as your router’s
-
Open up command prompt, and in the command prompt type ‘IPconfig’, press enter and look for:
IPv4 Address.......: XXX.XXX.X.X
and
Default Gateway.....:XXX.XXX.XXX.XXX
Example Image:
- The first one is your local IP address
- The second one is your router’s IP Address
If you have problems during this section, it’s recommended you search how to portforward online or ask your ISP for help. Some ISPs hide the options or don’t allow portforwarding
Open up your web browser and type the IP address for your router and you should get a login box.
- If you were unable to find your router’s IP Address, you can also try visiting these common router IPs:
Look at the back of your router or search for the router online and find the username and password. Admin is a popular default username/password
- Make sure that the ‘Protocol’ or ‘Service Type’ is either ‘TCP/UDP’ or ‘BOTH’.
- If you do not have this option then do the step twice, one in TCP and one on UDP
Add a service name if required, save, and test your server by connecting with localhost (if you’re hosting on the computer you’re testing it on)
- Sign in and then find something like ‘Port Forwarding’, ‘Firewall’, or ‘Virtual servers’
- Click ‘Add’, then put the IP address you got from earlier in ‘IPv4 Address’ or ‘IP address’In the ‘Outbound Port’ and ‘Inbound port’ or ‘Start port’ and ‘end port’ put ‘25565’
As the final step to allow people outside your network to join, you will need to give them your public IP address, which you can find here. They can put the IP (which will look like XXX.XXX.XXX.XXX), into the server address box or the direct connection box.
Addresses to connect with:
- If you are hosting and playing on the same device, use
localhost - To connect from inside the network, for instance, if you’re in the same house, use the local IP address
- To connect from outside the network, for instance, with your friend who is not at your house, use your public IP address